Sunday, September 21, 2025
AWS and MongoDB Atlas: High-Performance Connection with VPC Peering and Terraform


Introduction
The following post is a summary of how to establish a high-performance connection between private workloads in AWS and MongoDB Atlas services.
Atlas is a cloud platform that simplifies the deployment, operation, and scalability of MongoDB databases.
Context
A common reason to consider Atlas services is when you need your MongoDB deployment to have high availability, security, automated backups, and smooth integration with your cloud provider, whether AWS, Azure, or GCP, without the need to manage servers.
Scope
For this post, we will implement VPC Peering, which in short enables secure and private communication between resources hosted in your VPC and Atlas-managed instances without exposing them to the internet.
In addition, to demonstrate subnet connectivity, you will create a pair of EC2 instances within a public network as bastions without access to Atlas. Finally, we will deploy another instance in a private subnet with the ability to access Atlas services.
The following high-level diagram shows the target architecture we are going to implement.

TLDR
All source code can be found in the following repository.
Implementation
For this post we assume that accounts have already been created in both AWS and Atlas.
Otherwise, you can use the following links:
VPC
We start by defining our VPC in us-east-1. At a minimum you must ensure the creation of two subnets. To optimize costs we specify the creation of only one NAT Gateway by setting single_nat_gateway.
It’s important to keep in mind the network segments we are going to work with. For this post we defined 10.0.0.0/16.
// main.tf

// AZ Availables
data "aws_availability_zones" "available" {
  state = "available"
}

locals {
  vpc_name = "vpc-${var.project_name}"
  ## Use 3 AZs form data.aws_availability_zones.available.names
  azs            = slice(data.aws_availability_zones.available.names, 0, 3)
  vpc_cidr_block = "10.0.0.0/16"

  # Generate 3 private subnets (/24 each)
  private_subnets = [
    for i in range(3) : cidrsubnet(local.vpc_cidr_block, 8, i)
  ]

  # Generate 3 public subnets (/24 each), offset to avoid overlap
  public_subnets = [
    for i in range(3) : cidrsubnet(local.vpc_cidr_block, 8, i + 100)
  ]

  additional_public_subnet_tags = {
    "public" = "true"
  }
  additional_private_subnet_tags = {
    "private" = "true"
  }
}

module "vpc" {
  source  = "terraform-aws-modules/vpc/aws"
  version = "6.0.1"

  name = local.vpc_name
  cidr = local.vpc_cidr_block

  azs             = local.azs
  private_subnets = local.private_subnets
  public_subnets  = local.public_subnets

  map_public_ip_on_launch = true


  enable_dns_hostnames = true
  enable_dns_support   = true

  enable_nat_gateway     = true
  single_nat_gateway     = true
  one_nat_gateway_per_az = false

  public_subnet_tags = merge(
    local.additional_public_subnet_tags,
    {}
  )
  private_subnet_tags = merge(
    local.additional_private_subnet_tags,
    {}
  )

  tags = local.tags
}
MongoDB Cluster
Next we move on to creating the necessary resources for the MongoDB cluster in Atlas, defining the Mongo Atlas CIDR block as 10.8.0.0/21. It’s important to use the same region between AWS and Atlas.
This ensures there is no overlap between segments and prevents conflicts when setting up VPC peering.
locals {
mongodb_org_id = data.mongodbatlas_roles_org_id.warike_development_mongodb_atlas_org_id
mongodb_project_name = var.mongodbatlas_project_name
mongodb_cluster_name = "cluster-${local.project_name}"
mongodb_provider_name = "AWS"
mongodb_region_name = "US_EAST_1"
mongodb_main_database_name = "database-${random_pet.warike_development_atlas_database.id}"
mongodb_administrator_username = "administrator-${random_string.warike_development_atlas_username.id}"
mongodb_administrator_password = random_password.warike_development_atlas_password.result
atlas_cidr_block = "10.8.0.0/21"
}
## Random name
resource "random_pet" "warike_development_atlas_database" {
length = 6
separator = "-"
}
## Random String
resource "random_string" "warike_development_atlas_username" {
length = 4
lower = true
}
## MongoDB Atlas password
resource "random_password" "warike_development_atlas_password" {
length = 20
special = false
override_special = "_%@"
}
## MongoDB Atlas organization ID
data "mongodbatlas_roles_org_id" "warike_development_mongodb_atlas_org_id" {
}
## MongoDB Atlas Project
resource "mongodbatlas_project" "warike_development_mongodb_atlas_project" {
name = local.mongodb_project_name
org_id = data.mongodbatlas_roles_org_id.warike_development_mongodb_atlas_org_id.org_id
limits {
name = "atlas.project.deployment.clusters"
value = 1
}
is_collect_database_specifics_statistics_enabled = true
is_data_explorer_enabled = true
is_extended_storage_sizes_enabled = false
is_performance_advisor_enabled = true
is_realtime_performance_panel_enabled = true
is_schema_advisor_enabled = true
tags = local.tags
}
## MongoDB Atlas Database User
resource "mongodbatlas_database_user" "warike_development_mongodb_atlas_db_user" {
username = local.mongodb_administrator_username
password = local.mongodb_administrator_password
project_id = mongodbatlas_project.warike_development_mongodb_atlas_project.id
auth_database_name = "admin"
roles {
role_name = "dbAdmin"
database_name = local.mongodb_main_database_name
}
depends_on = [
random_password.warike_development_atlas_password,
random_string.warike_development_atlas_username,
random_pet.warike_development_atlas_database
]
}
## MongoDB Atlas Advanced Cluster
resource "mongodbatlas_advanced_cluster" "warike_development_mongodb_atlas_cluster" {
project_id = mongodbatlas_project.warike_development_mongodb_atlas_project.id
name = local.mongodb_cluster_name
cluster_type = "REPLICASET"
backup_enabled = false
replication_specs = [
{
region_configs = [
{
electable_specs = {
instance_size = "M10"
node_count = 3
}
provider_name = local.mongodb_provider_name
region_name = local.mongodb_region_name
priority = 7
tags = local.tags
}
]
}
]
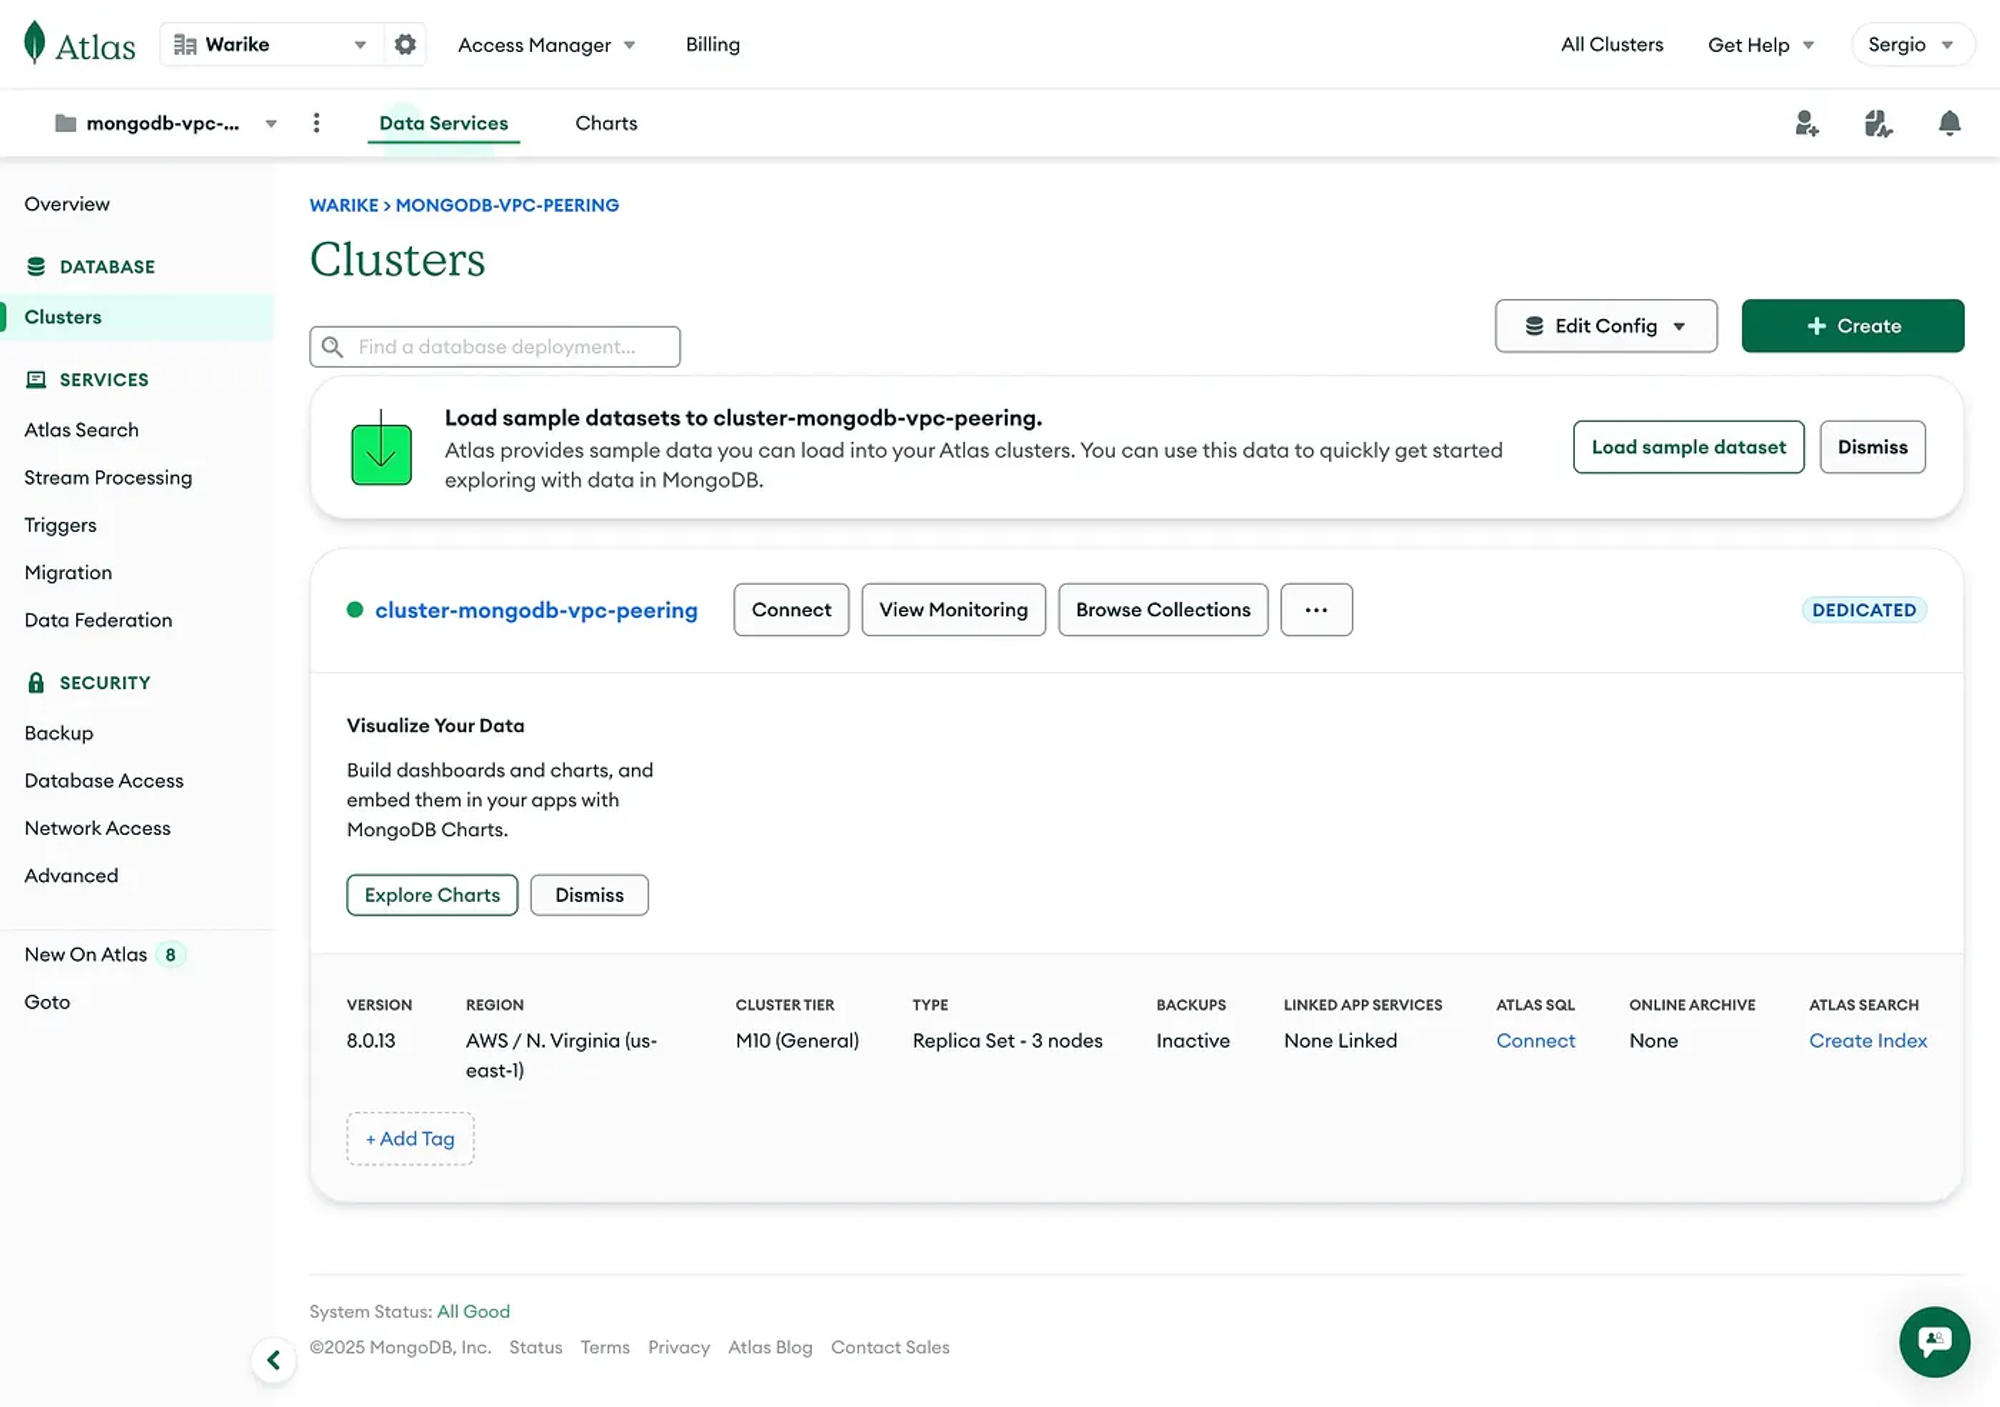
}After applying the changes we can see the cluster being created in the Atlas platform. Once the process finishes we can view the final result.
The following image shows the MongoDB Atlas dashboard with the cluster created.
VPC Peering
locals {
  aws_private_cidr_block = module.vpc.private_subnets_cidr_blocks[0]
  mongodb_ip_list = {
    "AWS"  = local.aws_private_cidr_block,
    "MyIP" = var.my_ip
  }
}

data "aws_caller_identity" "current" {}

## MongoDB Atlas Network Container
resource "mongodbatlas_network_container" "warike_development_mongodb_atlas_network_container" {
  project_id       = mongodbatlas_project.warike_development_mongodb_atlas_project.id
  atlas_cidr_block = local.atlas_cidr_block
  provider_name    = local.mongodb_provider_name
  region_name      = local.mongodb_region_name
}

## MongoDB Atlas Project IP Access List from local mongodb_ip_list
resource "mongodbatlas_project_ip_access_list" "warike_development_mongodb_atlas_ip_access" {
  for_each = local.mongodb_ip_list

  project_id = mongodbatlas_project.warike_development_mongodb_atlas_project.id
  cidr_block = each.value
  comment    = each.key
}

## MongoDB Atlas Network Peering
resource "mongodbatlas_network_peering" "warike_development_mongodb_atlas_network_peering" {
  container_id  = mongodbatlas_network_container.warike_development_mongodb_atlas_network_container.id
  project_id    = mongodbatlas_project.warike_development_mongodb_atlas_project.id
  provider_name = local.mongodb_provider_name

  accepter_region_name   = local.aws_region
  vpc_id                 = module.vpc.vpc_id
  aws_account_id         = data.aws_caller_identity.current.account_id
  route_table_cidr_block = local.aws_private_cidr_block
}

## AWS VPC Peering Connection Accepter
## Accept the peering connection request
resource "aws_vpc_peering_connection_accepter" "warike_development_mongodb_atlas_vpc_peering_connection_accepter" {
  vpc_peering_connection_id = mongodbatlas_network_peering.warike_development_mongodb_atlas_network_peering.connection_id
  auto_accept               = true

  tags = {
    Side = "Accepter"
    Name = local.project_name
  }
}

## AWS Route for MongoDB Atlas Network Peering
resource "aws_route" "warike_development_mongodb_atlas_vpc_peering_route" {
  route_table_id            = module.vpc.private_route_table_ids[0]
  destination_cidr_block    = local.atlas_cidr_block
  vpc_peering_connection_id = mongodbatlas_network_peering.warike_development_mongodb_atlas_network_peering.connection_id
  depends_on = [
    aws_vpc_peering_connection_accepter.warike_development_mongodb_atlas_vpc_peering_connection_accepter
  ]
}
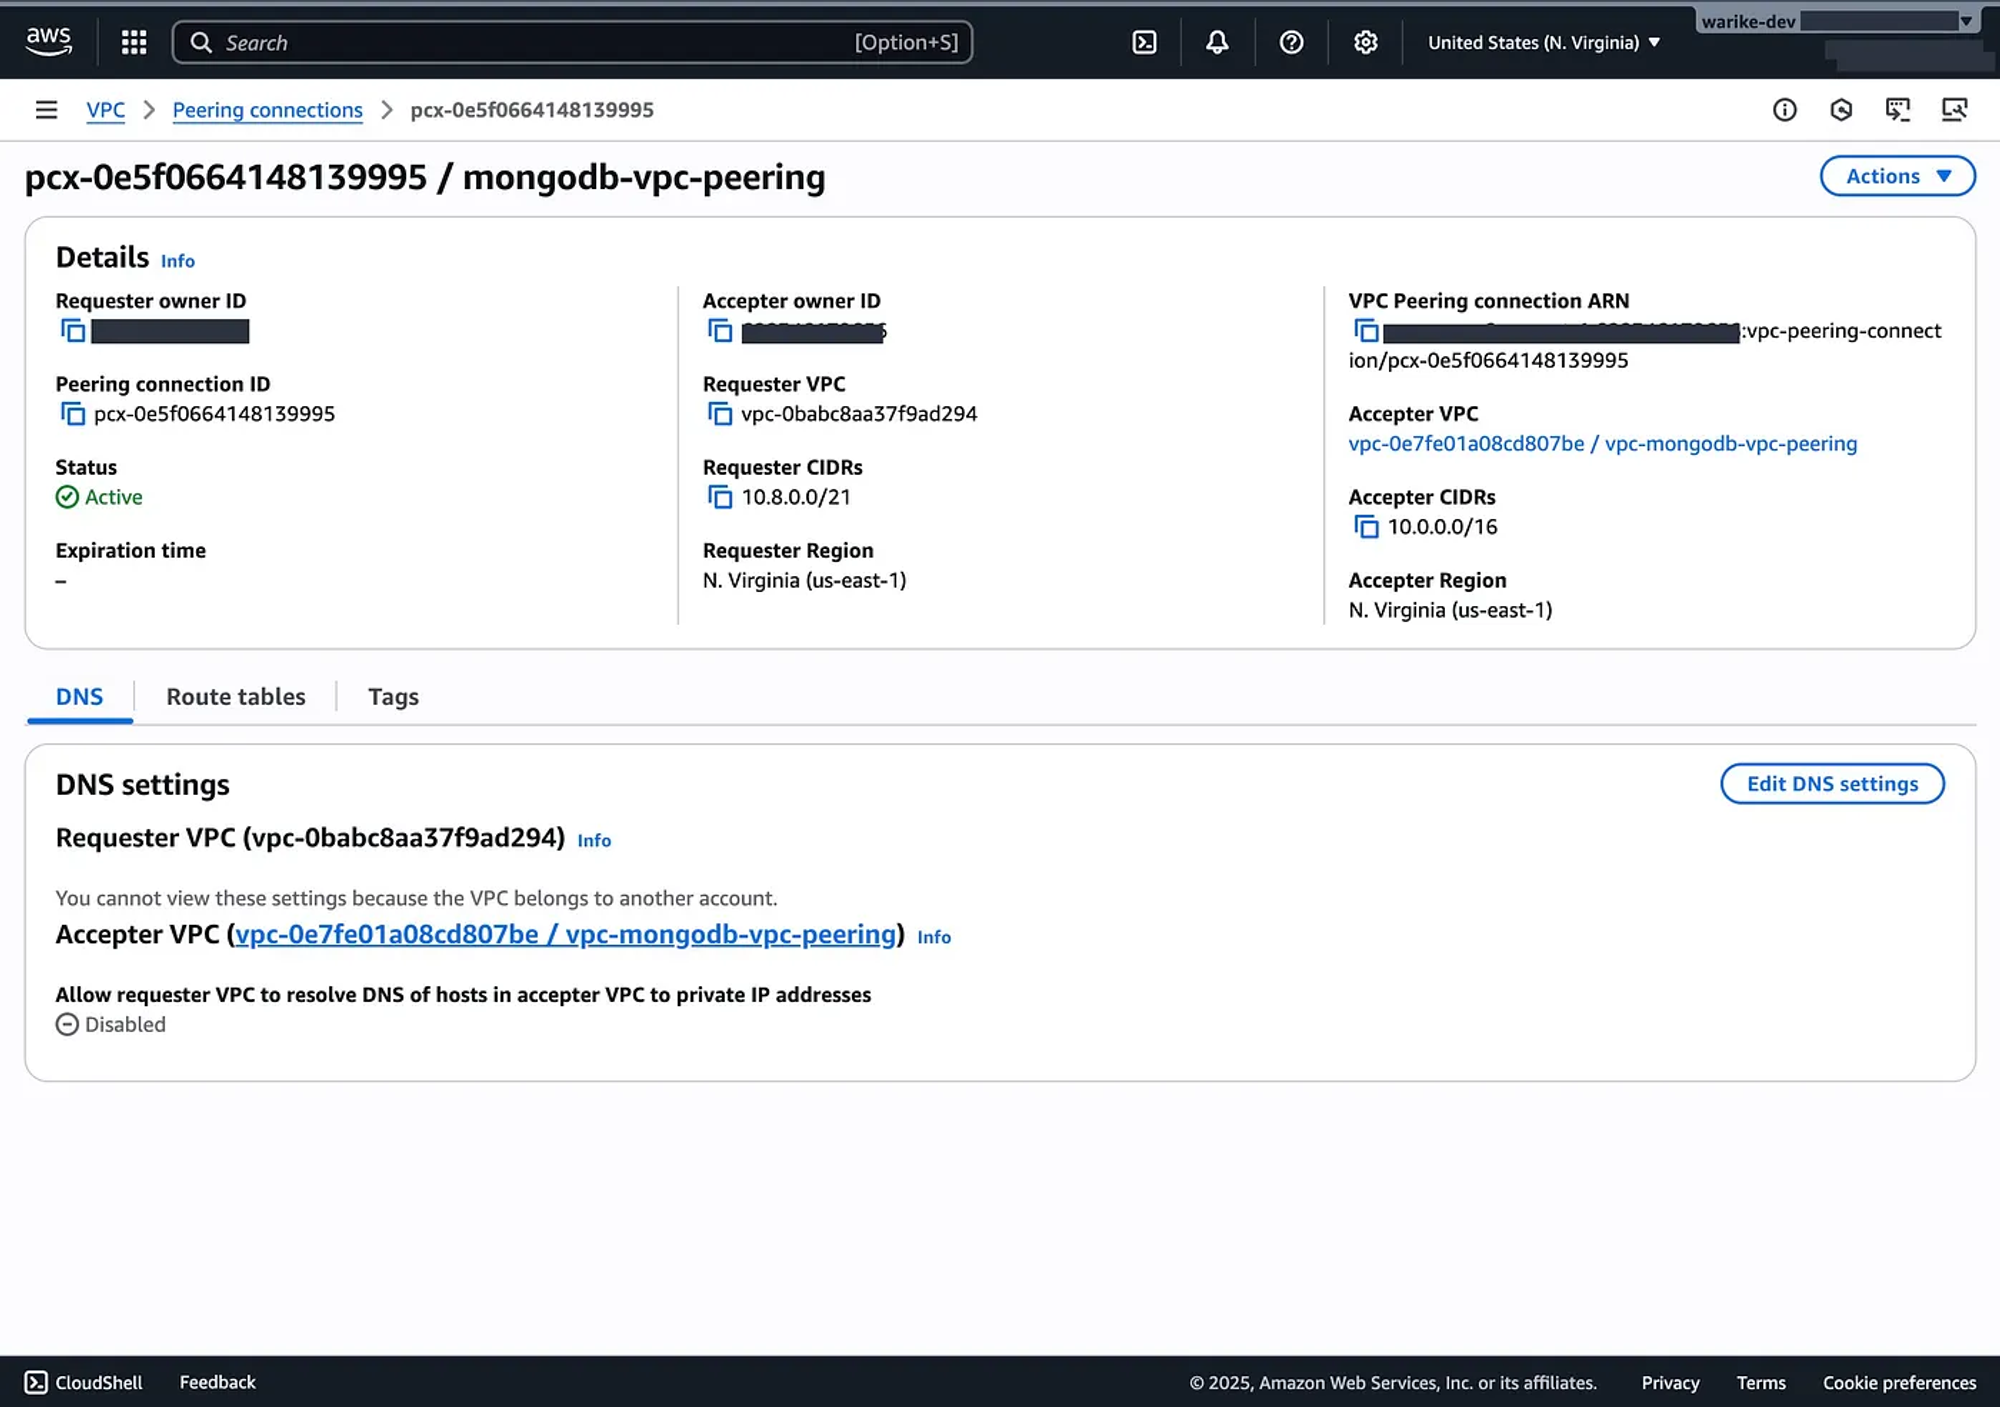
The next image shows the MongoDB Atlas dashboard with the mapping of the first private subnet segment 10.0.0.0/24, and the Atlas segment 10.8.0.0/21.
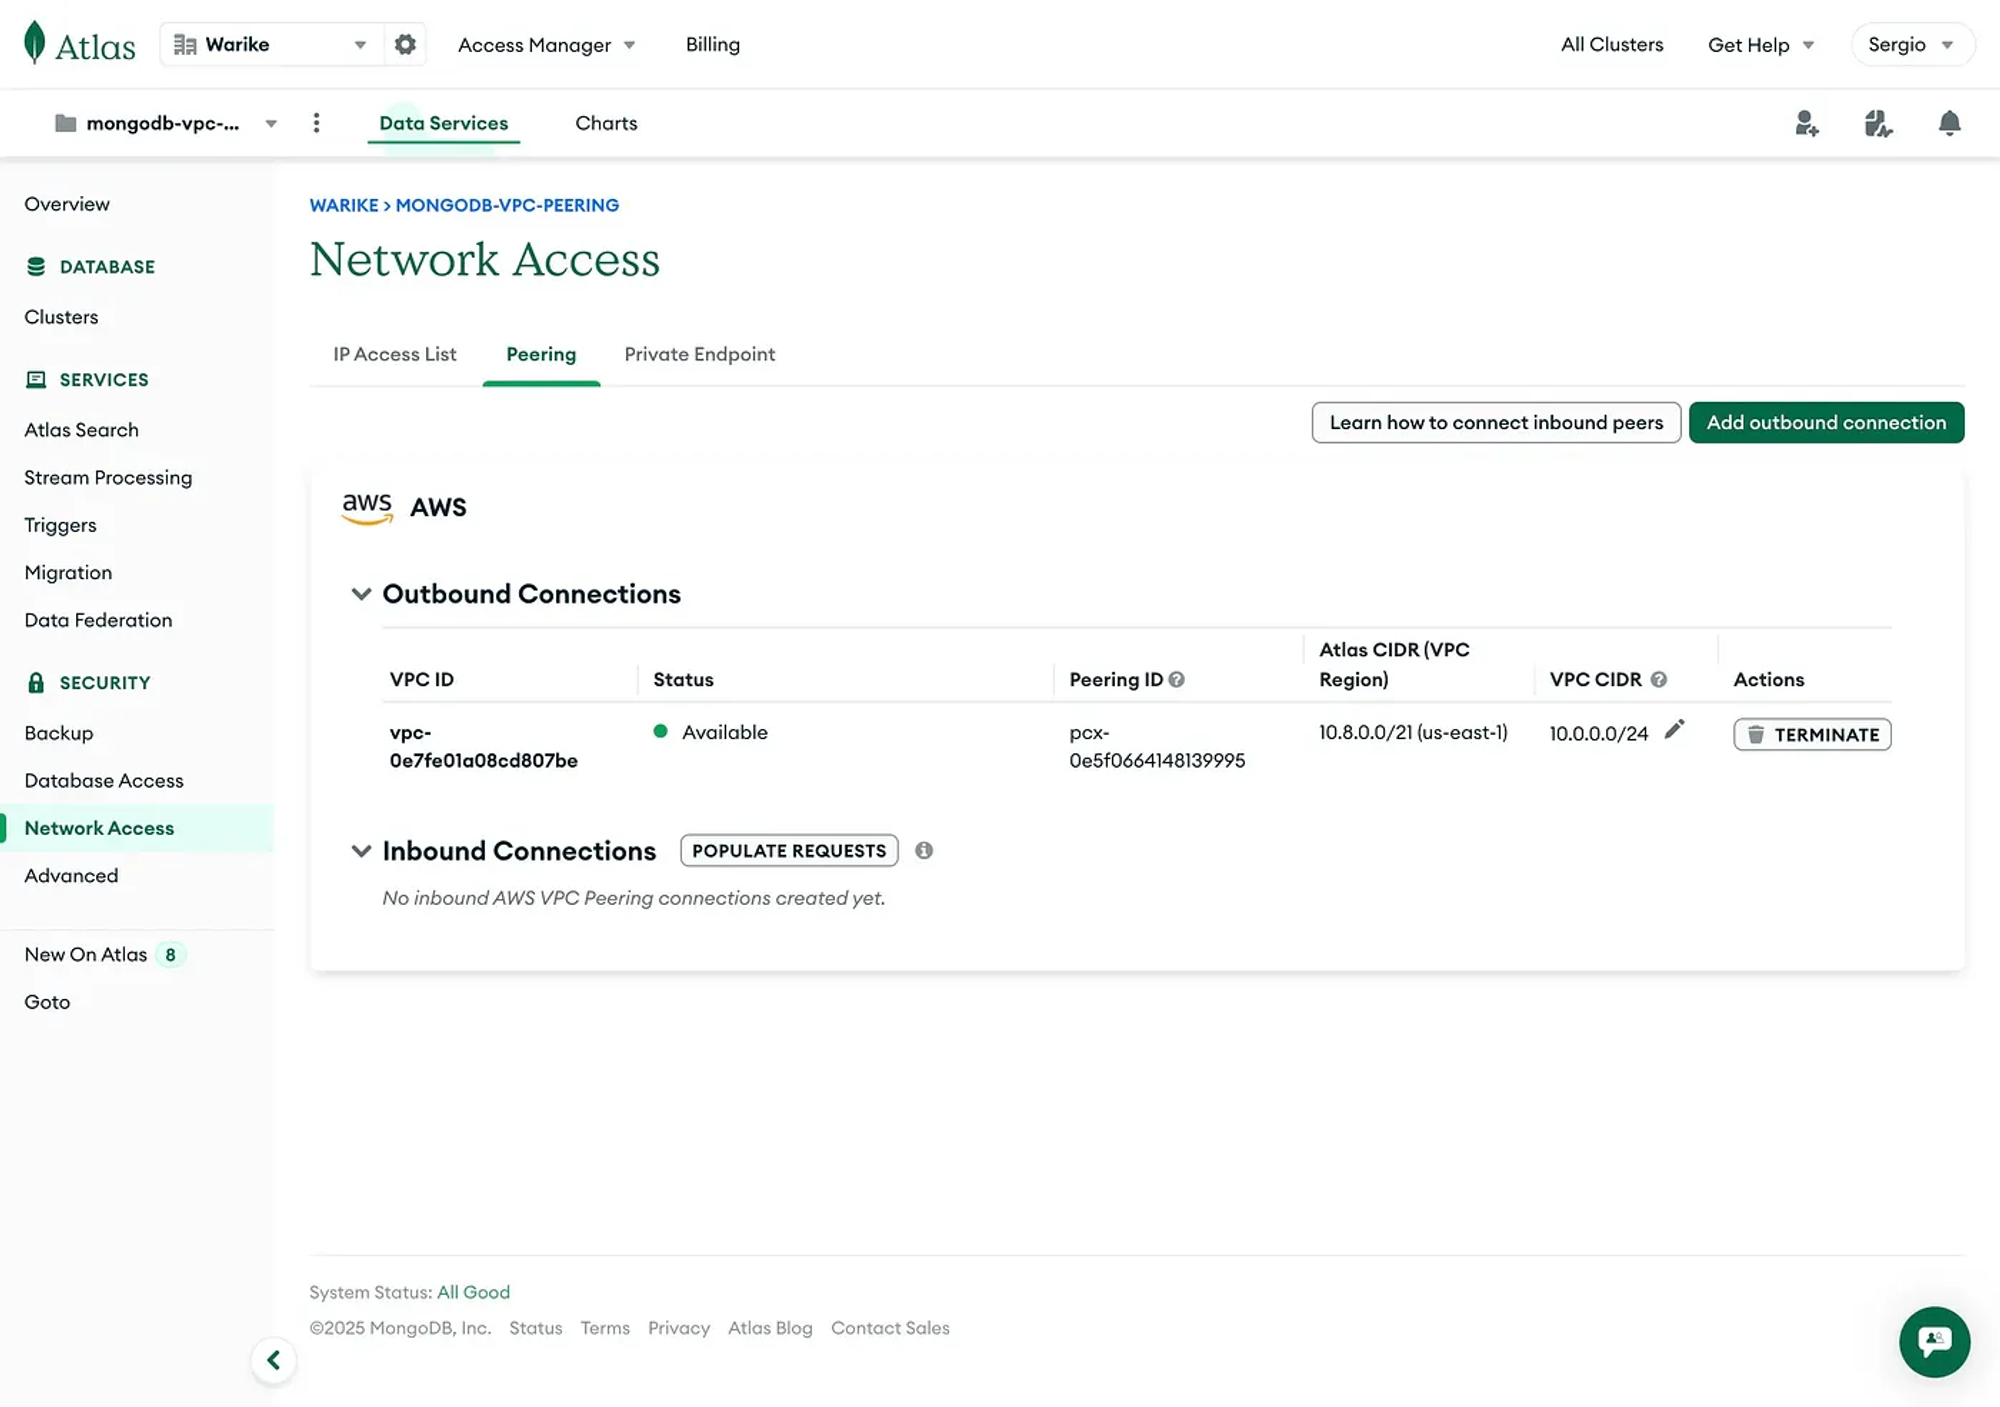
Additionally, we can observe the counterpart from our AWS account.
Compute instances
Let’s go ahead and deploy the EC2 instances inside their respective subnets. Additionally, I’ll add the VPC CIDR and my IP so we can move between machines over SSH.
locals {
  key_name = "key-${local.project_name}"
  key_pair = var.key_pair

  instances = {
    bastion = {
      name                        = "bastion-${local.project_name}"
      type                        = "t2.micro"
      subnet_id                   = module.vpc.public_subnets[0]
      associate_public_ip_address = true
    }
    internal = {
      name                        = "internal-${local.project_name}"
      type                        = "t2.micro"
      subnet_id                   = module.vpc.private_subnets[0]
      associate_public_ip_address = false
    }
  }

  whitelist_cidr_blocks = [
    local.vpc_cidr_block,
    var.my_ip
  ]
}

data "aws_ami" "latest_amazon_linux" {
  most_recent = true
  owners      = ["amazon"]

  filter {
    name   = "name"
    values = ["amzn2-ami-hvm-*-x86_64-gp2"]
  }
}

# AWS Key Pair
resource "aws_key_pair" "warike_sandbox_instaces_key_pair" {
  key_name   = local.key_name
  public_key = local.key_pair
}

# AWS Bastion instance
resource "aws_instance" "warike_sandbox_bastion" {
  for_each = local.instances

  ami                         = data.aws_ami.latest_amazon_linux.id
  instance_type               = each.value.type
  subnet_id                   = each.value.subnet_id
  associate_public_ip_address = each.value.associate_public_ip_address
  key_name                    = aws_key_pair.warike_sandbox_instaces_key_pair.key_name

  vpc_security_group_ids = [
    aws_security_group.warike_sandbox_instances_security_group.id,
  ]

  tags = {
    Name         = each.value.name
    InstanceType = each.value.type
  }
}

# AWS Security group
resource "aws_security_group" "warike_sandbox_instances_security_group" {
  name        = "instances-sg-${local.project_name}"
  description = "Security group for ${local.project_name} instances"
  vpc_id      = module.vpc.vpc_id

  ## allow ssh
  ingress {
    from_port   = 22
    to_port     = 22
    protocol    = "TCP"
    cidr_blocks = local.whitelist_cidr_blocks
  }
  ## allow icmp
  ingress {
    from_port   = -1
    to_port     = -1
    protocol    = "ICMP"
    cidr_blocks = local.whitelist_cidr_blocks
  }
  ## allow egress
  egress {
    from_port = 0
    to_port   = 0
    protocol  = "-1"
    cidr_blocks = [
      "0.0.0.0/0"
    ]
  }

  tags = {
    Name = "instances-sg-${local.project_name}"
  }
}
Testing
To test the implementation the first step is knowing the connection string we need to connect to.
We can retrieve it from the following output:
## MongoDB Atlas standard connection string
output "atlas_connection_string" {
  value = mongodbatlas_advanced_cluster.warike_development_mongodb_atlas_cluster.connection_strings.standard
}
Once we have the connection string, we can try logging into the instances. Below are the commands to access both the instance in the public subnet and the one in the private subnet:
ssh -A -i aws-key.pem ec2-user@<public-ip-bastion>
ssh -A -i aws-key.pem -J ec2-user@<public-ip-bastion> ec2-user@<private-ip-internal>
Next, you should install MongoSH on each instance:
echo "[mongodb-org-7.0]
name=MongoDB Repository
baseurl=https://repo.mongodb.org/yum/amazon/2/mongodb-org/7.0/x86_64/
gpgcheck=1
enabled=1
gpgkey=https://www.mongodb.org/static/pgp/server-7.0.asc" | sudo tee /etc/yum.repos.d/mongodb-org-7.0.repo

sudo yum install -y mongodb-mongosh
mongosh --version
With everything installed, you can attempt the connection:
mongosh "mongodb://<credentials>@<url>:27017/?ssl=true&authSource=admin&replicaSet=atlas-zogrp0-shard-0"
Bastion
As expected, when trying to connect from the Bastion in the public subnet we get a timeout.
Current Mongosh Log ID: 68cd84a4ab953eefb8ce5f46
Connecting to: mongodb://<credentials>@<url>:27017/?ssl=true&authSource=admin&replicaSet=atlas-zogrp0-shard-0
MongoServerSelectionError: Server selection timed out after 30000 ms. It looks like this is a MongoDB Atlas cluster. Please ensure that your Network Access List allows connections from your IP.
Internal
Also as expected, when connecting from the Internal instance in the private subnet we get a successful connection.
Current Mongosh Log ID: 68cd843bc940d026fece5f46
Connecting to: mongodb://<credentials>@<url>:27017/?ssl=true&authSource=admin&replicaSet=atlas-zogrp0-shard-0
Using MongoDB: 8.0.13
Using Mongosh: 2.5.8
For mongosh info see: https://www.mongodb.com/docs/mongodb-shell/
To help improve our products, anonymous usage data is collected and sent to MongoDB periodically (https://www.mongodb.com/legal/privacy-policy).
You can opt-out by running the disableTelemetry() command.
Deprecation warnings:
  - Using mongosh on the current operating system is deprecated, and support may be removed in a future release.
See https://www.mongodb.com/docs/mongodb-shell/install/#supported-operating-systems for documentation on supported platforms.
Atlas atlas-zogrp0-shard-0 [primary] test>
I can see that as a success.
Conclusions
The process of creating a VPC Peering connection is quite straightforward and efficient. In addition, setting up a secure configuration is simple and well-documented.
This becomes especially important when considering the externalization of the MongoDB service.